Tuesday, April 17, 2012

I am a new Mama that is extremely happy for her crock pot, because I found this recipe and love it !!

Ok so my sweet little angel Charlie Kate is a whopping  5 weeks old this week and I cant believe it !! It feels like I was just in that delivery room pushing my brains out, sadly time is just racing by me and my little one is growing like a weed before my eyes. As a new mommy I don't have nearly the time that I use to have to cook, blog and experiment in my kitchen on the newest recipe that I have found so if you are following my blog just hang in there I will get the hang of things eventually. So between baby, her daddy and house work and a total lack of sleep it was a breath of fresh air to find this recipe. It is a great recipe that uses my new best friend my crock pot. It is crock pot orange chicken and I really love it! I was skeptical at first because I have always been a crock pot snob and believed in cooking everything fresh and from scratch ....... yeah well those days are OVER!!!  I love that I can whip this up in no time and get back to my little one and have dinner on the table when my honey gets home.  I can maintain my Super Woman status at least for another day ..

Crock Pot Orange Chicken
Ingredients:
• 3-4 boneless chicken breasts, chopped into small chunks
• 1/3 cup flour
• olive oil
• 1/2 T salt
• 1 teaspoon balsamic vinegar
• 3 T ketchup
• 6 oz. frozen orange juice concentrate (thaw or throw it in the microwave for 45 seconds)
• 4 T brown sugar

First you take your OJ concentrate, Ketchup, Brown sugar, Vinegar and salt , mix it together and put it in your crock pot. I then Cut up my chicken and toss it in my frying pan with the olive oil and fry it till brown. once golden brown you just add it to your crock pot and cook on high for 2-3 hours of on low for 5-6 hours. 


Once complete you can serve over rice or with stir fry veggies. I found this recipe on The pursuit of Happiness blog , want to make sure she gets credit and know that I appreciate her post. 

Tuesday, March 20, 2012

Spinach Dip Recipe Just for my Mama .

My mom and little brother LOVE spinach dip and she is always asking me for my recipe, so I told her that I would post it on her just for her. Love you mom.

Amazing Spinach and Artichoke dip 

  • 8 oz. Cream Cheese, warmed in the microwave for 2 minutes on 50% heat to soften it – (Even if you’re making your dip in the oven, pre-microwaving the cream cheese will help you mix it with the other ingredients, so I recommend not skipping this step.)
  • A dollop of sour cream – maybe 1/4 – 1/3 cup
  • A dollop of mayonnaise – about 1/4 cup
  • About a cup of chopped spinach (either fresh, cooked, or frozen, thawed)
  • 2 cans or jars of non-marinated artichoke hearts, roughly chopped
  • Garlic salt
  • Chili powder – be generous! The cream cheese and sour cream will act to “cool” the dip, so you can sprinkle away with the chili!
  • A handful of shredded mozzarella cheese ( I mix some in and sprinkle some on top)
I bake this at 350 degrees , until cooked through then turn on the broiler to brown the cheese on top till bubbly . So there you go mama I hope that you enjoy!! 
                                                                                                                     -Kerry 

My New Favorite Pasta Dish !!!

Ok so on Thursday March the 15th our wonderful little girl finally arrived !! So with the demands of a newborn I have been trying to get down a little routine with our girl while keeping to my normal routine. That's why I love this recipe it is easy and absolutely Delicious, I was able to whip it up while she was taking a nap and my husband loved it as well. I found it through the pinterest website on another blog and she likes it for the same reasons that I do. I hope that you give it a chance and enjoy it as much as we did.


Chicken & Spinach Pasta Bake

  • 8 oz uncooked rigatoni
  • 1 T olive oil
  • 1 c chopped onion
  • 1 (10 oz) pack frozen spinach, thawed
  • 3 c cubed, cooked chicken breasts
  • 1 (14 oz) can Italian-style diced tomatoes, drained
  • 1 (8 oz) container Philadelphia chive & onion cream cheese
  • ½ t salt, ½ t pepper
  • 1½ c shredded mozzarella cheese
Prepare rigatoni according to pkg directions.  Spread oil on bottom of 11×17 in baking dish; add onion in a single layer.  Bake at 375 for 15 minutes or just until tender.  Transfer onion to large bowl, set aside.
Drain chopped spinach well, pressing between paper towels.  Stir in rigatoni, spinach, chicken, & next 4 ingredients into onion in bowl.  Spoon mixture into dish & sprinkle evenly with shredded mozzarella cheese.  Bake covered at 375 for 30 minutes; uncover & bake 15 more minutes or until bubbly.


Friday, February 24, 2012

My stuffed owl toys

I made these for my little girl and niece they are just to cute and were totally easy to make. I didn't take enough pictures to do a tutorial but I did take these. I traced the pattern out onto wax paper and Cut out my fabric. I then added the face and wing embellishments before turning inside out and sewing together.I then turned them right side out stuffed them and sewed up the little hole lol see filter easy.


I have been sick sick sick ... but its nothing some homemade cookies cant fix.

So on top of being super duper pregnant I have had a horrific head cold, which has just been so much fun..... NOT!!! Any way being in such a crappy situation I decided to try and make the best of my time to rest and make some things for Charlie. I have been sewing up a storm making everything from burp clothes and stuffed owl's to receiving blankets, but all that sewing makes a girl hungry and  since it's me we are talking about that means my sweet tooth gets cranked into high gear. So what did I bake you may ask ? Chocolate chip cookies of course and they were absolutely to Delicious for words.

My Chocolate Chip Cookie  Recipe 
Ingredients: 
3/4 c. unsalted butter, softened 
3/4 c. brown sugar 
1/4 c. granulated sugar 
1 egg 
2 tsp. vanilla extract 
2 c. all purpose flour 
1 1/2  tsp. cornstarch 
1 tsp. baking soda 
1/2 tsp. salt 
2 c. bittersweet chocolate chips

Directions:
1.  Preheat oven to 350 degrees F.

2.  In the bowl of a stand mixer fitted with a paddle attachment, cream together butter and sugars until fluffy and light in color. Add egg and vanilla and blend in.


3.  Mix in flour, cornstarch, baking soda and salt. Stir in chocolate chips.

4.  Using a standard-sized cookie scoop or tablespoon, drop dough onto a prepared baking sheet.  Bake for 8-10 minutes, until barely golden brown around the edges.  (The tops will not brown, but do NOT cook longer than ten minutes.)

5.  Let cool, on the sheet, on a wire rack for five minutes.  Remove from baking sheet and let cool completely.  Makes approximately 3 dozen.  Try not to eat them all, My Husband always does

Wednesday, February 8, 2012

OMG I love this Bread Recipe !!!

So I haven't posted anything lately because I have been soooo busy but I just have to share this recipe with you!!! I found it on Pinterest, and boy did it blow my mind. It is a recipe for  30 minute baguettes and it totally rocks, I mean I am use to bread taking several hours to make this was no time flat. My husband went crazy over the texture of this bread when I made it in the shape of french loaves but I also used it last night in the form of buns for our chicken salad sandwiches and boy did it rock. So please,please,please give this recipe a try you totally have the time and it only takes 5 super easy ingredients. The only thing that I found was that It does require a bit more flour than the recipe calls for to get it to not be sticky so that you can knead the bread. Here is the link to the recipe and next time I make this I will post pictures. Tonight is Chinese food night and will be posting those recipes and pictures tomorrow and the day after my famous chocolate chip cookies.
                                                                                                                                           - Kerry
30 minute Crusty Baguettes recipe

Wednesday, February 1, 2012

I am so ready for summer... So I made Lemon Squares !


This super weird weather has got me longing for spring and summer months to arrive, not the 110 degree weather but the mild breezy days in the 80's. I love spring and summer, all of the fresh flowers and vast variety of produce at the market just gets me all excited. Probably one of my favorite summer flavors though is Citrus, there is nothing better than drinking a nice cold glass of lemonade on your front porch.... Ahhh. So to shake my " I miss the spring and summer" blues I decided to make some Lemon Squares to give me that fresh summer is around the corner lets go to the park kind of feeling. I found this recipe on all recipes.com and decided to give it a whirl. It seemed easy and didn't require a lot of weird ingredients like some recipes call for, plus it was raining outside... what other option do I have but to bake. 
 Lemon Squares Recipe 
For the Crust 
          • 1 Cup Of Butter Softened 
          • 1/2 Cup of Sugar 
          • 2 Cups Of All-Purpose Flour 
          • A pinch of salt
                                                      For Lemon Filling 
          • 4 Eggs 
          • 1 1/2 Cups of Sugar 
          • 1/4 Cups of All- Purpose Flour 
          • The Juice of 2- 3 Lemons 
          • 2 tsp. Of Lemon Zest 
                INSTRUCTIONS
                                  Pre heat oven to 375 Degrees.


 In Medium bowl ( I just used my Kitchen aid mixer) Blend together Butter,sugar, flour and salt for crust until it all comes together  
 IT will look like this picture above ^ . I then pressed it down into a parchment paper lined and greased 13x 9 pan.  Once evenly pressed you place it in the oven to bake for 10-15 minutes depending on your oven.
 while your crust layer is pre baking you can begin to pre-pair the lemon Filling.

 You take the eggs, lemon juice, zest, sugar , and flour and mix until it comes together. You then remove your crust from the oven and add your Lemon mixture and put back in the oven to bake for 15-20 Minutes. Once they are done you can eat them as is or give them a nice dusting of powdered sugar.
And they come out like this ! I hope that they can pick up a rainy winter day for you like they did for me. Enjoy!

Tuesday, January 31, 2012

My super easy Chicken Marsala knock off recipe.

My Husband and I love going to eat at a local restaurant called The Suite, It's a cozy little place that serves Italian and Mediterranean style food that is always wonderful. It can be a little costly whenever we go but it is always worth it, I usually get the Chicken Marsala with Roasted veggies and I am never disappointed. I love this dish so much that I would say that I am slightly addicted to it, which brought me to the inspiration to come up with this super easy concoction.  We don't always have the money,time or wine to make that wonderfully light mushroom and white wine reduction to smother our sauteed chicken breast in on a weeknight, but we do usually have the ingredients to make my almost as satisfying recipe in our pantry. When I list the recipe you are going to be like " Is she serious ?" Yes I am and it comes out wonderful every time my husband goes gaga over it. 

Easy Chicken Marsala Knock off Recipe 

      • I use 4 Large Boneless Chicken Breast 
      • 1 Can of Golden Mushroom Soup 
      • 4 Oz. of Softened Cream Cheese 
      • Half a bottle of Kraft Italian Dressing ( I use the roasted red pepper kind)
      • 1 tsp. Of Basil 
      • 1 tsp. Of Garlic powder 
      • Salt and Pepper to taste  
When it comes to the seasonings you can play around with those depending on whether or not you enjoy more Herbs or not I sometimes even add just a pinch of Cayenne pepper for a extra flare. 
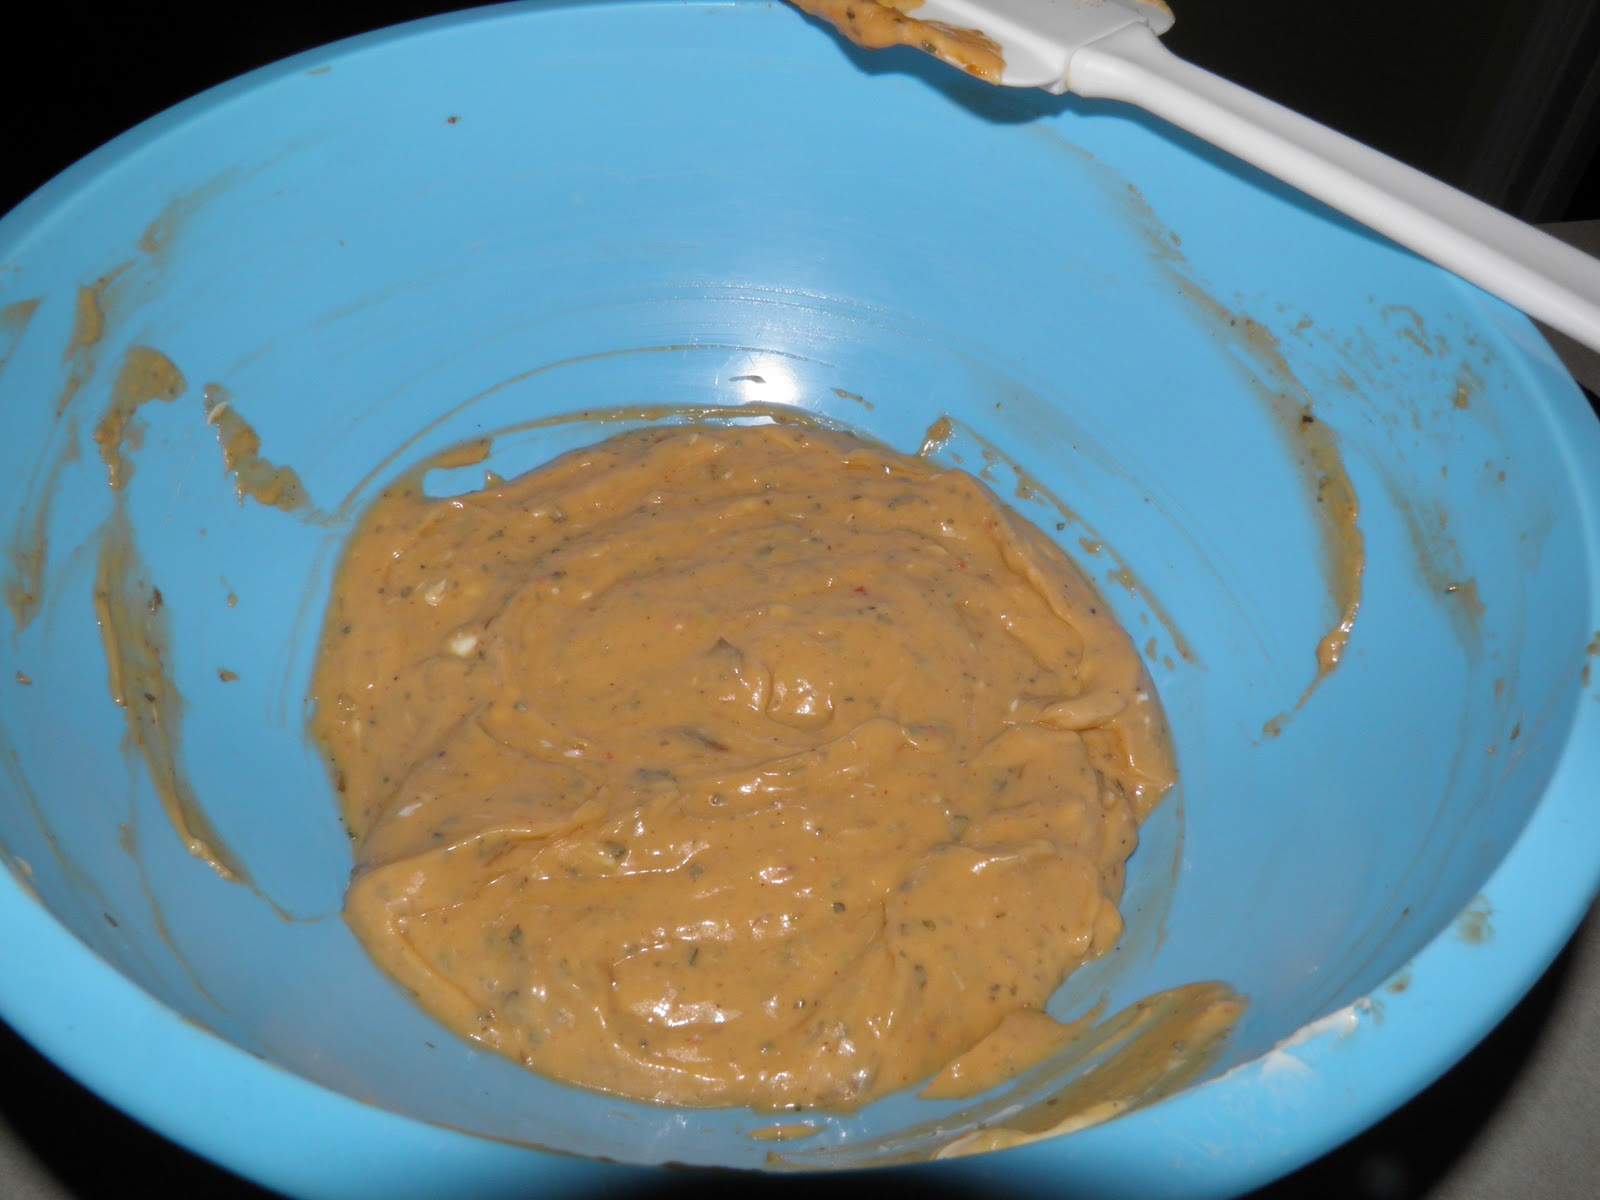
 You take the Softened Cream Cheese, Italian dressing, Golden Mushroom soup, and seasonings and mix them all together really well .
 I then salt and pepper my Chicken Breast on both sides just for flavor.
 Then you just cover the Chicken Breast in your Mushroom sauce and make sure both sides are coated and bake at 375. As far as a time goes I'm awful at keeping time of things when I am cooking I would say about 30 minutes or until the sauce is bubbly and thick and appears somewhat reduced.
 Mean while I usually begin to prepare my side dishes. Last night I made oven roasted garlic mashed potatoes and green beans. I almost always fix mashed potatoes with this because the extra sauce is just so good on top of them.

 And here is your finished Product , although not Gourmet it is a fast , easy and delicious weeknight meal that will defiantly curve your craving for the real thing. At least for a little while that is, if your anything like me. Its also really good paired with Rosemary and Garlic roasted Potatoes and Roasted Brussels Sprouts but my husband loves green beans so that's what he got.
<Please note that I am so not a food Photographer and took the best pictures that I could > 
                                                                                                    Enjoy, Kerry 

Monday, January 30, 2012

Our Little Girl's Nursery


OK so here are the pictures of her nursery that we have been working so hard on, We went with a light pink and gray color scheme and I have to say although unusual I think that it came out very beautiful. I made the rug, mobile lamp shade and some burp cloth's to match. I will list the directions or link to directions below.

 OK so as you can see I used the same material in the burp cloth's, rug, and lamp shade and It looks pretty darn good If I do say so my self. As far as directions go let's start with the lamp shade because it was the easiest of all the projects. It is just a self adhesive lamp shade from Hobby Lobby and it gives you the pattern to cut out of your fabric and you just stick it to it and finish of the inside trim with a hot glue gun. O and I used a 40% off coupon that you can pull up on your smart phone and saved even more money so I'm sure you could apply this situation pretty much to any lamps that you would like to make for your home. For her burp cloth's I used the Cotton Diapers and took the material and cut it to fit the middle most absorbent part and just ran them through my sewing machine and they came our great and they match here is a Link to the directions with a step by step process. Burp cloth Tutorial from a fellow blogger that post's great stuff.

 The hobby horse that you see that was a gift from my Husband's mother she loves it and His name is Wilbur lol.
 I particularly LOVE her Crib bedding I ordered it from Carousel Bedding and It is super pretty and soft. You can order all types of customized bedding from there site. Babybedding.com . I just love the pink and gray together it looks pretty yet fresh.
  I also made this rug for her nursery because I just couldn't find one that matched. It took quiet a bit of time to make one this size but was totally worth it. It is made from the skid proof rug backing and about 5 yards of a jersey/ T shirt type of material. I got this Idea from I site I'm addicted to called Pinterest and It worked like a charm and you can pretty much personalize it to your hearts desire.Here are the Directions for  Handmade rug. .Now in their tutorial they use old towels, but I prefer the jersey material because when you cut it and stretch all of the little pieces you don't have to worry about the edges fraying and making a mess it looks nice and neat.      


 For her Butterfly Mobile , now that was a different story it was not as easy to make I took a embroidery loop and covered it with white ribbon, then cute our a million little pink butterflies from heavy card stock that I got at the craft store and glued them to fishing line in a chandelier  type effect and it just looks darling hanging from her ceiling. I got the idea once again from Pinterest. Here Is the link to more extensive directions . Directions to Handmade Butterfly mobile
But overall  I Think that everything came together beautifully I am very happy with the results. Now all this picture needs is our sweet little girl then it will be perfect.
                                                                                                                                Kerry,

Welcome !!

OK so I am so not a writer, so please don't expect anything wonderfully articulated or witty I am just a wife and soon to be mommy giving you the daily dish on the Dunn household and a glimpse into my life. I  am married to The greatest man on the face of the planet, he is a very excited soon to be daddy and Lineman. I am currently 32 weeks pregnant with our first child , her name is Charlie Kate and she cannot get here soon enough. I have been wanting to create a blog for quiet some time now but I just haven't had the time. I have been working diligently on our little girls nursery for ever now and it is finally complete. So  I figured with the new aches and pains that come with the end of pregnancy I could take a load off and begin my blog! I just want to share what I'm cooking , crafting and upcoming pictures with family and friends so that they can stay in the loop and I can share some of the things that I love. So welcome to my  blog I hope that you enjoy it. <O and speaking of her nursery I will be posting pictures and links to instructions of things that I made in her nursery later. >

                                                                     Kerry.